Before I learned about VS Code, I wrote PowerShell scripts in ISE and put them into Dropbox, so I can work on it at different computers. However, Dropbox could not track the changes for the scripts. After I learned VSCode, it became my primary code editor. With Azure Repos (DevOps) extension, I am able to sync my codes anywhere I go.
This post will show you how to install and configure the following applications to manage PowerShell scripts.
- Install Visual Studio Code
- PowerShell Extension
- Azure Repos Extension (VSTS)
- Install Git for Windows
- Install Posh-Git Module
- Clone Azure Repos in VS Code
- Configure PS Profile
Install Visual Studio Code
- Install the latest version of Visual Studio Code

2. There are two versions of the installer. The User Installer is for a single user, and the System Installer is for all users on the system.

3. Click the Extension icon and search for PowerShell. Install the extension

4. Install Azure Repos extension

Install Git for Windows
5. Install Git for Windows

6. Unselect all the options since we will run Git from VSCode

7. Chose VSCode as Git`s default editor

8. Keep default on the PATH environment

9. Use OpenSSH

10. Use the native Windows Secure Channel library

11. Keep default on the line ending conversions

11. Use Windows default console window

12. Keep default on the extra options

Install Posh-git Module
13. Install Posh-Git module. Posh-git is a PowerShell module that integrates Git and PowerShell by providing Git status summary information that can be displayed in the PowerShell prompt.
Open PowerShell as Administratior and run the following command.
Install-Module posh-git -Scope AllUsers
14. Type “Y” to install the module

15. Make sure the module is installed

Clone Azure Repos in VSCode
16. Next step is to clone the Azure Repos in VSCode. Sign in to the Azure Repos find the Clone icon and click Clone in VS Code

17. Select the Repository Location on your local drive

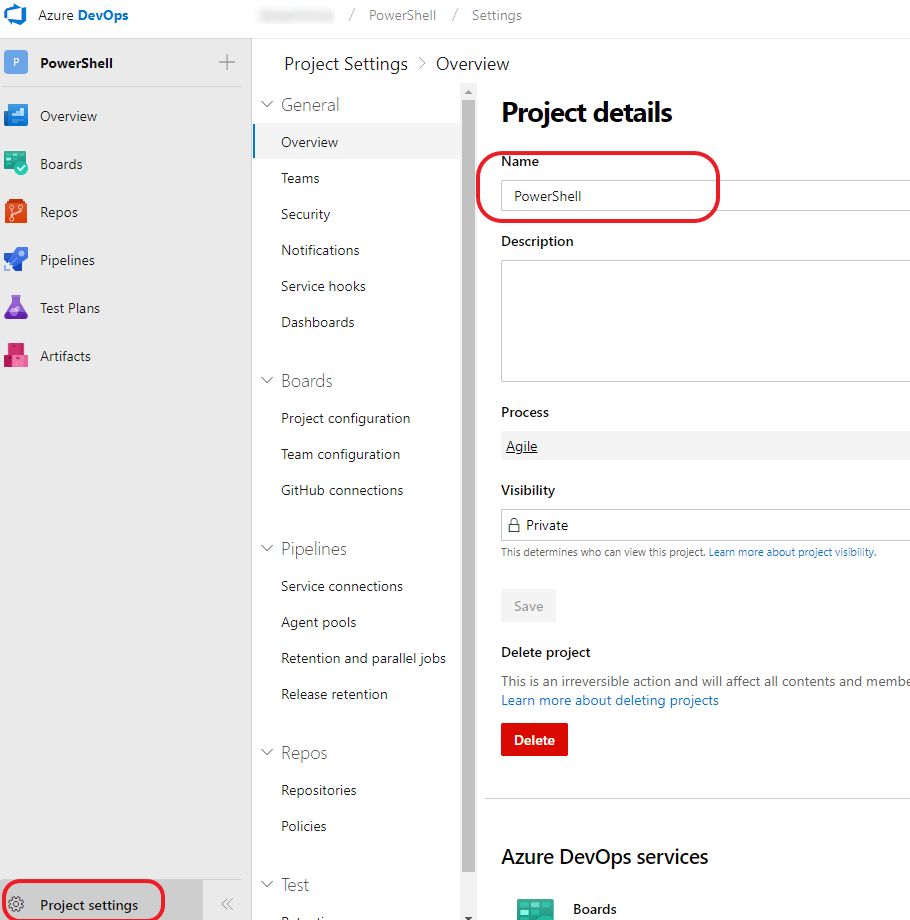
18. If you see the error Git: fatal: unable to access. , there could be spaces on your project name.

You can rename it from the Project settings

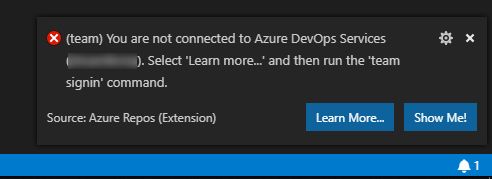
19. If everything goes well, it will prompt for sign in

20. Seeing another warning on the VSCode. We need to sign in the team.

21. Click Team on the left side bottom. Select “Authenticate and get an access token automatically (new experience)” option

22. Press “Enter” to confirm

23. Copy the code and sign in

24. You should see it change to the Project name after signin

Configure PS Profile
25. To see the color with posh-git. You need to update the PowerShell profile. Run the following command with your account that will be used for coding.
code $profile.CurrentUserAllHosts
26. Copy the following code to the profile and save
function prompt
{
    $curUser= (Get-ChildItem Env:\USERNAME).Value
    $curComp= (Get-ChildItem Env:\COMPUTERNAME).Value
    Write-Host -NoNewLine $curUser -ForegroundColor Cyan
    Write-Host -NoNewLine " @ " -foregroundColor Magenta
    Write-Host -NoNewLine $(Get-Location) -ForegroundColor Yellow
    Write-Host -NoNewLine "[" -foregroundColor Yellow
    Write-Host -NoNewLine ("{0:HH}:{0:mm}:{0:ss}" -f (Get-Date)) -foregroundColor White
    Write-Host -NoNewLine "]" -foregroundColor Yellow
    Write-Host -NoNewLine ">" -foregroundColor Red

    $host.UI.RawUI.WindowTitle = "PowerShell -- $curUser @ $curComp "
    Write-VcsStatus
    return " "
}
Reopen VS Code, you should see the colorful Git status in the terminal now 🙂
